TC04 - Moodle tutorial for teachers
Creating course categories and courses
Courses on Moodle are organised into Course Categories. These course categories can be created only by a system administrator.
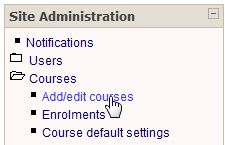
 From the Site administration block choose Courses than click on Add/edit courses.

Type the name of the category then click on Add new category button.
Different categories can be organized in a hierarchy. The parent category can be chosen from the pull-down menu, as it has to be created first.
Creating courses
To log in we need to have administrator's or course developer's rights.
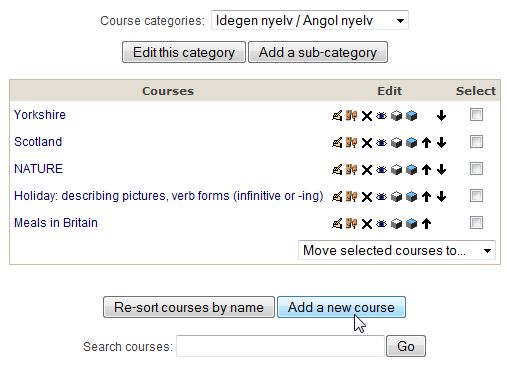
Administrators can reach course categories where new courses can be created from the Site administration block. Choose Courses then click on Add/edit courses. Enter the chosen category then click on Add a new course button.

Course developers have no Site administration block therefore here All courses should be chosen from the Course categories block (Courses may occasionally block pop up windows) and then click on Add a new course button.
Course settings
|
Category |
A course category should be chosen from the course listings. (Categories can be created by site administrators only.) |
|
Full Name |
This is the name of the course in the course listings. |
|
Short Name |
This name of the course appears in the navigation bar that is at the top of the course page and this provides an active link to the course home page. |
|
ID number |
Optional, but useful. More information in Help. |
|
Summary |
The summary appears on the course listings page. Here we can include a brief and interesting course summary. |
|
Format |
Weekly format: the course is organized week by week, with a clear start date and finish date. Topics format: superficially similar to the weekly format, but organised around the content or features. Social format: organised around forums and social interaction. |
|
Course Start Date |
The date given here is important when you use the Weekly course format. This will be the first day of the first week. This setting will not affect courses using the 'social' or 'topics' formats. However, the display of logs starts from this date. |
|
Enrolment plug-ins |
It is the default setting of the portal, no need to change. |
|
Default role |
It is the default setting of the portal, no need to change. |
|
Course enrollable |
Configures the course to be enrollable only in a specified date range |
|
Course duration |
see the point above |
|
Enrolment Period |
The number of days a student can be enrolled in a course. Students are automatically unenrolled after the number of days has expired in this setting. This is useful for rolling courses without a specific start or end time. |
| Number of Weeks/Topics |
The length of the course according to its format. |
| Group Mode |
No groups: there is one big group from the members of the course. Separate groups: we can separate the members of the course into different groups such that they do not see each others activities Visible groups: the groups created from the members of the course will work together, but they can also see other groups' activities Force: when the force setting is set to "yes" this particular group mode will be applied to every activity in that course. This will override any activities that may have a special group setting. |
|
Availability |
Allows courses to be hidden from students |
| Enrolment Key |
This enrolment key enables access to the course for those who are registered users of the site. We supply the enrolment key to students of the course at the beginning of the course. With this key the user will be registered as a student on the course. The key should be used only when entering for the first time. If this password "gets out" and you have unwanted people enrolling, you can unenroll them and change this key. Any legitimate students who have already enrolled will not be affected. |
| Guest Access |
Guests in a course always have "read-only" access. No guests allowed: we do not allow guests any access at all. Guests can access without an enrolment key: anyone can access as a guest. Guests with enrolment key only: if you choose to allow guests who have the key, then the guests will need to provide the current enrolment key every time they log in. |
| Hidden Sections |
Limits the speed as which a student can work through the content of the next period or next topic by hiding it. Non-available items can be completely hidden, so that students do not even see the number of the next section. In collapsed form the hidden section is shown, though they the hidden activities and texts cannot be seen. |
|
News Items to Show |
The News forum is a special forum created for each course on the front page, in a weekly or topic format. All enrolled students are automatically subscribed to the News forum. Messages are sent in email to subscribed members. The Latest News block displays a specific number of recent discussions on the screen. This specific number can be set. If this number is set to 0, the Latest News block will not show. |
|
Show Grades |
Many of the activities allow grades to be set. Here we can set whether we hide grades from students or not. |
|
Show Activity Reports |
Every activity is reported or logged in the system. From these reports we can see a student's activity and involvement of the course. Student access to their own reports is controlled by the teacher via this course setting. It is advisable to turn this feature off because showing activity reports can place a load on the server, slowing it down. |
|
Maximum Upload Size |
This setting defines the largest size of file that can be uploaded by students in this course. |
After changing settings, do not forget to click on Save changes button.